輕量級 MQTT Broker -- Mosquitto
本篇將介紹物聯網常用的 MQTT 通訊協定以及 Mosquitto
目錄
前言
最近因為一些緣故開始接觸 MQTT,在網路上一查,發現關於 MQTT 的文章相當多,於是經過一番整理後,想把一些內容記錄下來。
關於 MQTT
MQTT 是一種 machine-to-machine(M2M) 的輕量級通訊協定,由 IBM 的 Andy Stanford-Clark 博士和 Arcom 的 Arlen Nipper 博士於1999年發明,這個協定的訊息內容很精簡,非常適合用於網路頻寬有限的物聯網裝置與處理器,且已經有許多 MQTT Library 被開發出來,應用在 Python、Arduino、JavaScript…等,還有 Open Source 的 MQTT broker,使得開發物聯網的通訊變得相當簡單方便。

MQTT 訊息發送機制
MQTT 提供了一種使用發布/訂閱 ( Publish/Subscribe ) 機制執行訊息傳輸的輕量級方法,代理人 ( broker ) 是個伺服器軟體,向伺服器發送主題 ( topic ) 的一方是發布者 ( publisher),從伺服器取得主題的一方則是訂閱者 ( subscriber ) ,如下圖所示:
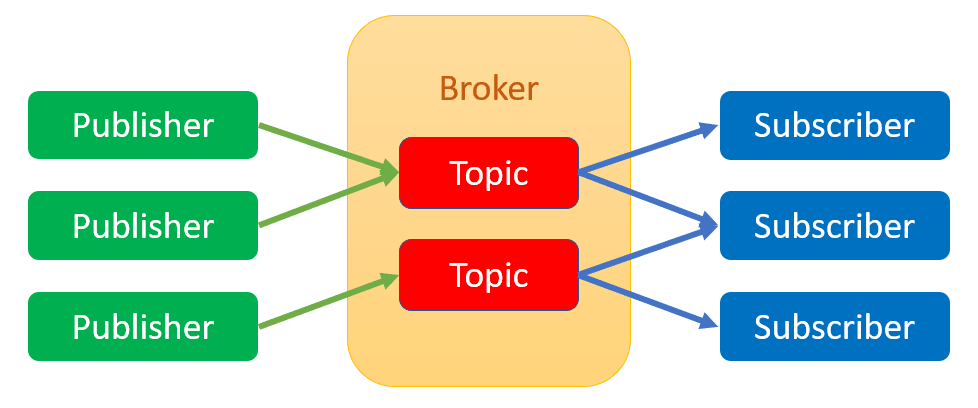
代理人可存放發布者的訊息,在發布者斷線的情況下,提供訂閱者最近更新的訊息。訂閱者需要告知代理人想要訂閱的主題,每當發布者發布新訊息時,代理人就會依照主題,傳送給所有訂閱者。「發布者」和「訂閱者」都是用戶端,代理人是伺服器。鑒於兩個用戶端之間有伺服器當作中繼站,所以兩邊並不需要知道對方的IP。
MQTT 的主題(Topic)名稱
我們可以自行決定主題名稱,例如: 傳送溫度的訊息主題可命名為「temp」。主題名稱也支援類似檔案路徑的階層式命名方式,每個階層之間用斜線 ( / ) 分隔,例如,我家房間的溫度感測器#1,其主題名稱可命名為:
myhome/room/temp1命名主題的注意事項:
- 有些裝置或程式語言不一定支援中文,主題名稱盡量使用英文
- 自訂的主題名稱請勿用$開頭,也不可包含#和+
- 名稱長度不可超過216位元組
- 名稱最好不要加入空格
- 名稱大小寫有區別
MQTT QoS
QoS (Quality of Service) 代表發布者與代理人或代理人與訂閱者之間的傳輸品質。MQTT定義了 0 、 1 和 2 三個層級的品質設定(有些伺服器軟體不一定三個層級都支援,Mosquitto 全都支援):
- 0: 最多傳送一次(At most once)
- 1: 至少傳送一次(At least once)
- 2: 確實傳送一次(Exactly once)
QoS 0 : 發布者傳送訊息給代理人,但不保證訊息會送達
QoS 1 : 發布者傳送訊息給代理人,當代理人收到訊息之後,會回應 PUBACK (publish acknowledgement)訊息給發布者,確認有收到訊息。如果過了一段時間,發布者沒有收到 PUBACK ,它會認定訊息沒有送達,因而重新傳送一次訊息
QoS 2 : 當代理人收到訊息時,它將回覆 PUBREC (publish received),並暫存訊息的 packetId ,以防重複處理相同的訊息。當發布者收到 PUBREC 回應時,會傳送 PUBREL (publish release)給代理人,接著代理人會先把訊息傳送給訂閱者,然後回應 PUBCOMP (publish complete)並刪除之前暫存的訊息
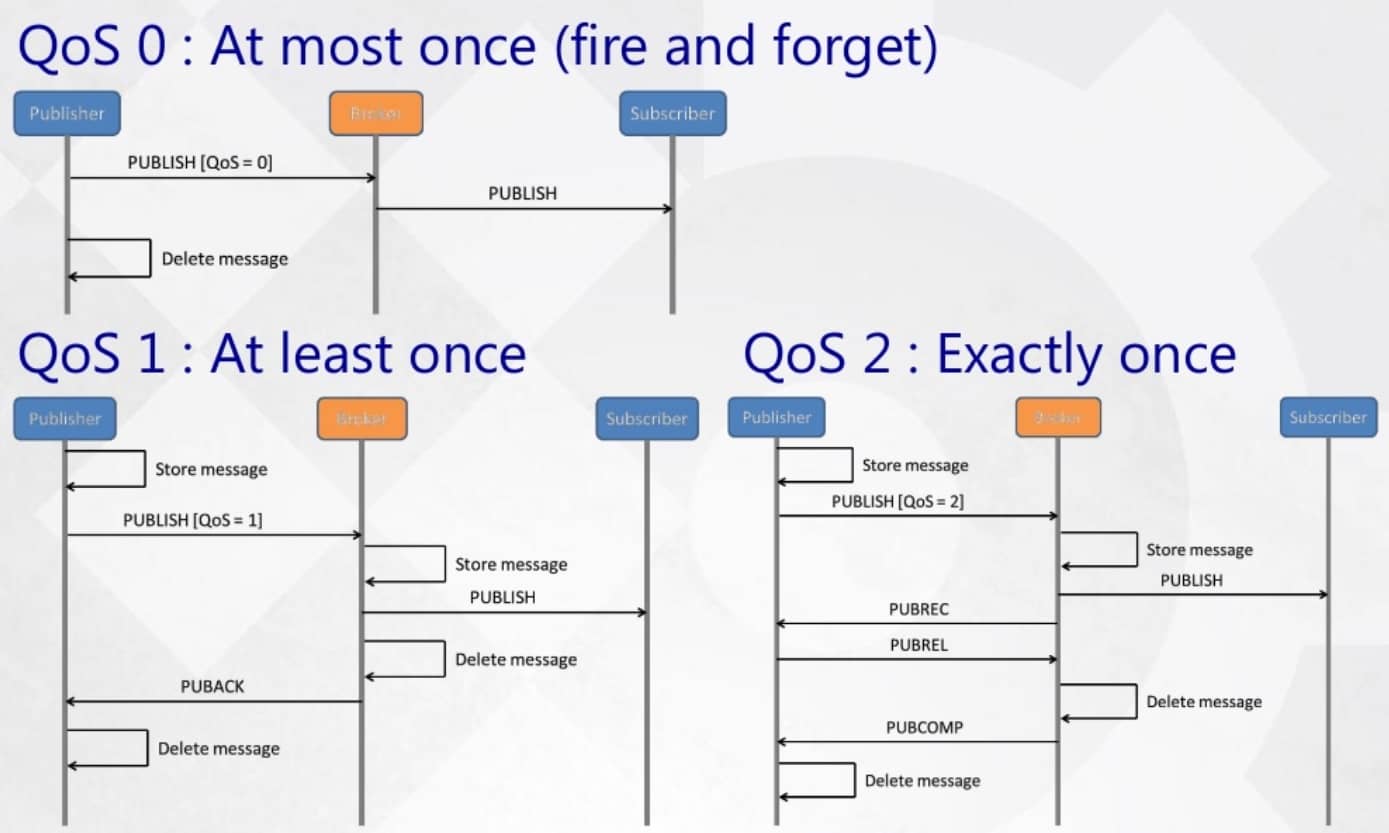
圖源: https://devopedia.org/mqtt
關於 Mosquitto
Mosquitto 是一個開放原始碼 MQTT broker,由 Eclipse 基金會所開發,實現了 MQTT 3.1.0、3.1.1 和 5.0 版本,其特點是輕巧,在低功耗的裝置或伺服器的所有設備上都適合使用。
它的功能包含儲存訊息以及處理訊息,若收到任何訊息,會根據不同 Topic 分類,並將訊息傳給有訂閱的用戶端。

安裝 Mosquitto
Mosquitto 支援各種常見的作業系統,而我自己是安裝在 Linux Ubuntu 上,若是要安裝在 Windows,請參考以下這篇文章: 安裝MQTT伺服器Mosquitto,Windows系統篇
其他系統安裝可參考官網: Download
在 Linux Ubuntu 上安裝
在 cmd 中按順序 type 以下指令:
# 如果使用的是較早版本的 Ubuntu 或想要較新版本的 mosquitto,請加入 mosquitto-dev PPA
$ sudo apt-add-repository ppa:mosquitto-dev/mosquitto-ppa
$ sudo apt-get update
$ sudo apt-get install mosquitto
$ sudo apt-get install mosquitto-clients
$ sudo apt clean
啟動和停止 Broker
根據安裝的方式不同,broker 可能會在 system startup 時自動啟動
啟動
$ sudo service mosquitto start
或是
$ sudo systemctl start mosquitto.service
停止
$ sudo service mosquitto stop
或是
$ sudo systemctl stop mosquitto.service
停止 / 啟動的動作會在後台啟動 mosquitto,並使用 /etc/mosquitto/ 文件夾當中的 mosquitto.conf
若是想在 console 上看到詳細 (verbose) 訊息並啟動,請 type:
$ mosquitto -v這對於「除錯」很有用
重新啟動
$ sudo service mosquitto restart
或是
$ sudo systemctl restart mosquitto.service
使用配置文件啟動 Mosquitto
安裝後的配置文件(mosquitto.conf)是完全註解掉的,因為 mosquitto 不需要配置文件就可以啟動。此文件由 mosquitto 在服務啟動時加載
在編輯預設配置文件之前,最好先做備份
要使用配置文件啟動 mosquitto,請 type:
$ mosquitto -c filename -v- 預設的 mosquitto.conf 位在
/etc/mosquitto/資料夾中 - 可以使用自訂的 mosquitto.conf,只須更改為該文件的相對路徑即可,例如: /home/andy/mos/mosquitto.conf
補充: mosquitto [-c config file] [ -d | --daemon ] [-p port number] [-v]
- -c Load configuration from a file
- -d Run mosquitto in the background as a daemon, and all other behaviour remains the same
- -p Listen on the port specified
- -v Use verbose logging
Important
In version 1.6.x and earlier, the listener defined by -p (or the default port of 1883) would be bound to all interfaces and so be accessible from any network. It could also be used in combination with -c.
From version 2.0 onwards, the listeners defined with -p are bound to the loopback interface only, and so can only be connected to from the local machine. If both -p is used and a listener is defined in a configuration file, then the -p options are IGNORED.
參考資料: Mosquitto man page
在 daemon 運行時停止 Mosquitto
請使用以下指令:
$ ps -aux | grep mosquitto
$ pgrep mosquitto
$ kill -9 PID (that you get from above command)
查看目前服務狀態
$ systemctl status mosquitto.service
或
$ service mosquitto status- 關於 mosquitto 其他指令,可以使用
mosquitto -h查看詳細使用方式 - broker 預設使用 port 1883 來監聽
使用 Mosquitto_pub 和 Mosquitto_sub 工具
Mosquitto_pub 和 Mosquitto_sub client端工具可以用來快速測試以及除錯,此工具與 Mosquitto 一起安裝並使用。
以下會介紹一些「發布」與「訂閱」的範例:
使用 Mosquitto_pub 發布
最簡單的例子:
$ mosquitto_pub -h localhost -m "test" -t home/sensor1- -h 代表設置 hostname 或 IP address,預設為 localhost
- -m 代表要傳送的訊息
- -t 代表主題名稱
我們可以加入
-d flag看到連線、發布以及斷線等訊息$ mosquitto_pub -h localhost -m "test" -t home/sensor1 -d
- -d 代表 列印 debug 資訊
常用的 Flag Option
- -r 設置 retain flag
- -n 傳送 null 訊息,適用於清除 retain 訊息
- -f 將指定檔案的內容作為傳送訊息的內容
- -p 設置 port number
- -q 指定QoS的值
- -u 使用者名稱
- -P 使用者密碼
- -i 指定客戶端clientid
- -I 指定clientId字首
- --help 提供協助
使用使用者名稱和密碼
$ mosquitto_pub -h localhost -m "test" -t home/sensor1 -u andy -P 1234 -d使用 Retain Flag
$ mosquitto_pub -h localhost -m "test" -t home/sensor1 -r -d
清除 Retained Message
$ mosquitto_pub -h localhost -t home/sensor1 -n -r -d使用 Client Name 此選項在使用帶有 ACL 的 prefix 或測試用戶端限制時很有用
$ mosquitto_pub -h localhost -m "test" -t home/sensor1 -i test_client -d
或
$ mosquitto_pub -h localhost -m "test" -t home/sensor1 -I test_client -d
發布 JSON 格式資料
$ mosquitto_pub -h localhost -t home/sensor1 -m "{\"value1\":60,\"value2\":20}"使用 SSL/TLS 加密
$ mosquitto_pub -h localhost -t home/sensor1 -m "test" -d --cafile certs/ca.crt -p 8883 --insecure- --cafile CA 文件路徑
- --insecure 如果證書上的名稱與實際的 hostname 不匹配,使用此選項
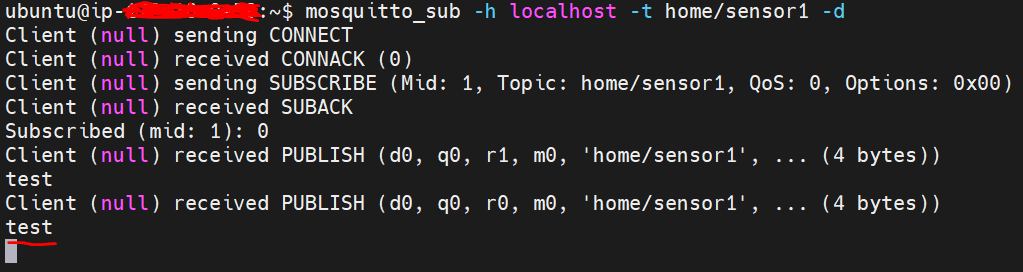
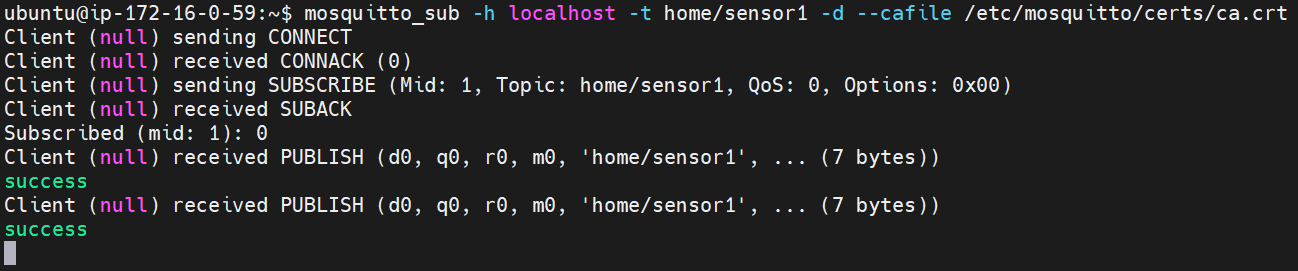
使用 Mosquitto_sub 訂閱
使用的 Flag 與 Mosquitto_pub 近乎一樣,僅有少數不同,所以不再贅述,只會介紹常用的 Flag
簡單的例子:
$ mosquitto_sub -h localhost -t home/sensor1 -d會收到發布者的訊息
限定收到的訊息數量 收到一定數量的消息後會切斷連線
$ mosquitto_sub -h localhost -t home/sensor1 -C 3在收到的訊息前顯示主題名稱
$ mosquitto_sub -h localhost -t home/sensor1 -v每隔一段時間,發PING訊息通知broker,仍處於連線狀態 (keepalive),預設為60秒
$ mosquitto_sub -h localhost -t home/sensor1 -k變更 QoS
$ mosquitto_sub -h localhost -t home/sensor1 -q 1 -d
當我們啟動 mosquitto_sub 時,它會無限運行,直到按 CTRL+C 才停止
設置 mosquitto.conf
Mosquitto 預設的配置文件為 mosquitto.conf,可以在 Linux 上的 /etc/mosquitto 資料夾中找到。為了使 mosquitto.conf 文件中的更改生效,必須重新啟動 mosquitto,在某些情況下,許多更改無需重新啟動 mosquitto 即可生效。
可以參考這篇文章: Quick Guide to The Mosquitto.conf File With Examples
官網參考資料: mosquitto.conf man page
新版 Mosquitto
Mosquitto v2 修改了一些功能,預設情況下,它需要「身份驗證」且「不在網路地址上做偵聽」。
以下簡單的配置文件 (mosquitto.conf) 將使 mosquitto 像之前版本一樣啟動:
listener 1883
allow_anonymous true
官網參考資料: Migrating from 1.x to 2.0
設置 SSL/TLS 安全設定
我想在 MQTT broker 與 client 之間建立加密連接,就像網頁瀏覽器與伺服器之間的安全連線。這邊我使用 OpenSSL 來創建自己的 Certificate authority (CA)、 Server key 以及 certificate
詳細步驟
為 CA 創建密鑰對 (key pair)
openssl genrsa -des3 -out ca.key 2048
可以為 CA 創建有密碼保護的密鑰
使用 CA 密鑰為 CA 創建證書
openssl req -new -x509 -days 1800 -key ca.key -out ca.crt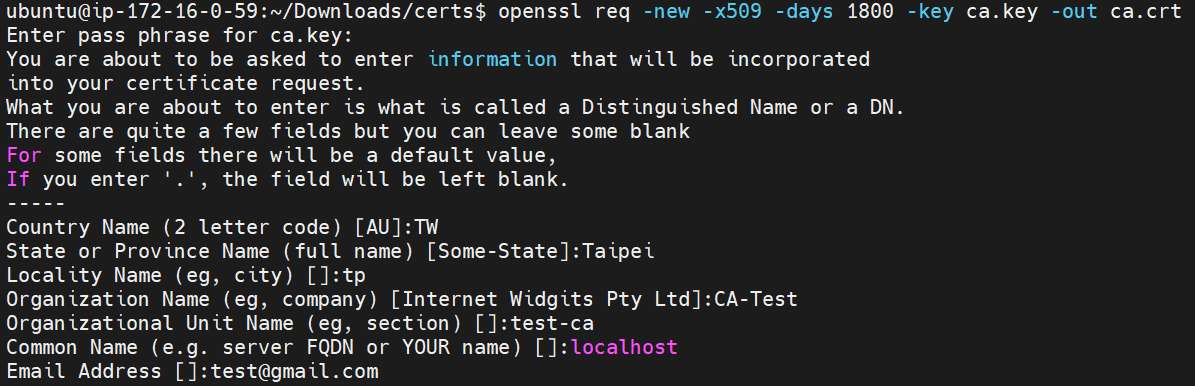
創建一個給 broker 使用的伺服器密鑰對
openssl genrsa -out server.key 2048
當生成密鑰時,不該對伺服器證書使用加密(-des3),因為這會創建一個 broker 無法解碼的受密碼保護之密鑰
創建一個證書請求 (csr)
openssl req -new -out server.csr -key server.key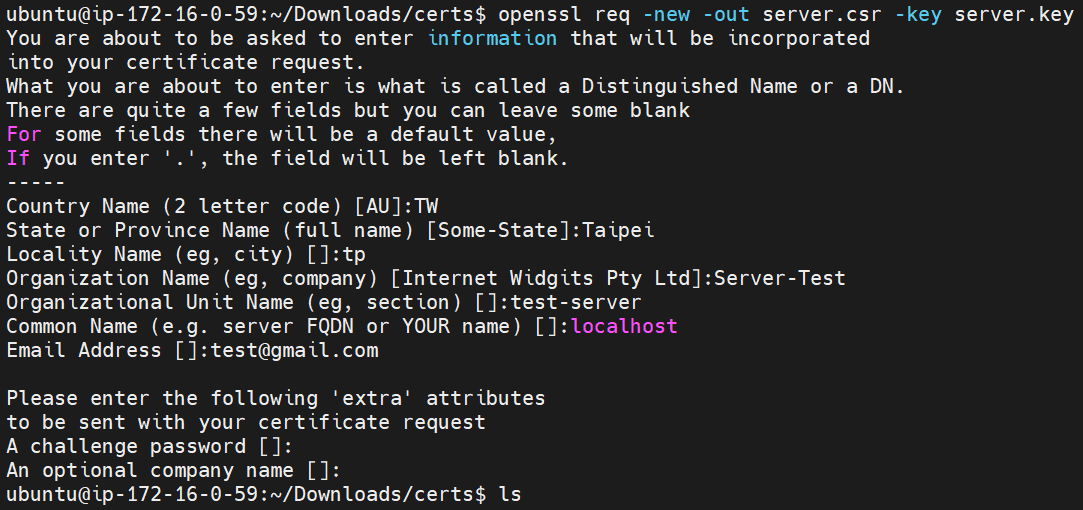
填寫表單時,CommonName (CN) 很重要,通常是電腦或伺服器的 hostname、full domain name 或是 IP address
在表單中輸入國家、組織等時,不要對 CA 和 Server 證書使用完全相同的配置,不然在執行時會報錯
使用 CA 密鑰來驗證和簽署服務器證書
openssl x509 -req -in server.csr -CA ca.crt -CAkey ca.key -CAcreateserial -out server.crt -days 360
總共產生六個檔案
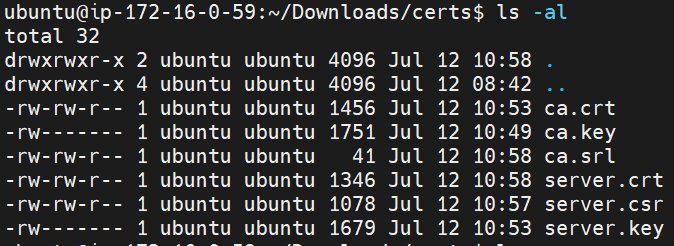
將 ca.crt、serever.crt 以及 server.key 複製到 /etc/mosquitto/certs/ 資料夾內
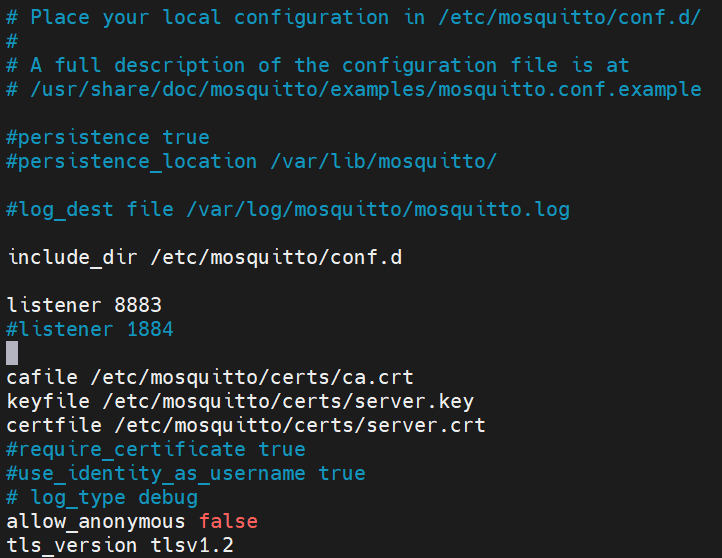
sudo cp server.key server.crt ca.crt /etc/mosquitto/certs/編輯 mosquitto.conf
驗證伺服器證書是否由特定 CA 簽名
openssl verify -CAfile ca.crt server.crt
會回傳

可以參考這篇文章: Mosquitto SSL Configuration -MQTT TLS Security
或是這些文章:
Secure Communication With TLS and the Mosquitto Broker
問題與解決辦法
設定完之後,執行
mosquitto -c mosquitto.conf -v,會發生錯誤:
根據我們安裝的位置, broker 是以 mosquitto 用戶身份執行,所以 mosquitto 必須具有讀取證書和私鑰文件的權限
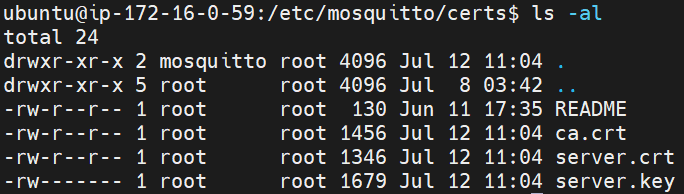
修改一下權限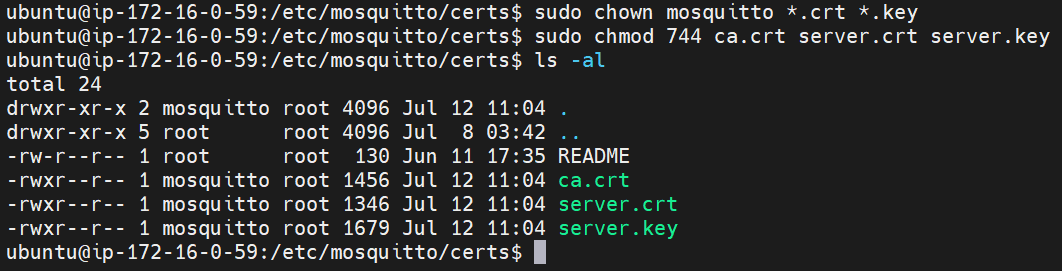
重新啟動 Mosquitto broker ,可以看到成功啟動使用 mosquitto_pub 與 mosquitto_sub 作測試時,會出現以下錯誤:

因為沒有經過授權連線,所以需要將 mosquitto.conf 中的
allow_anonymous設為true
經過重新啟動後就能測試成功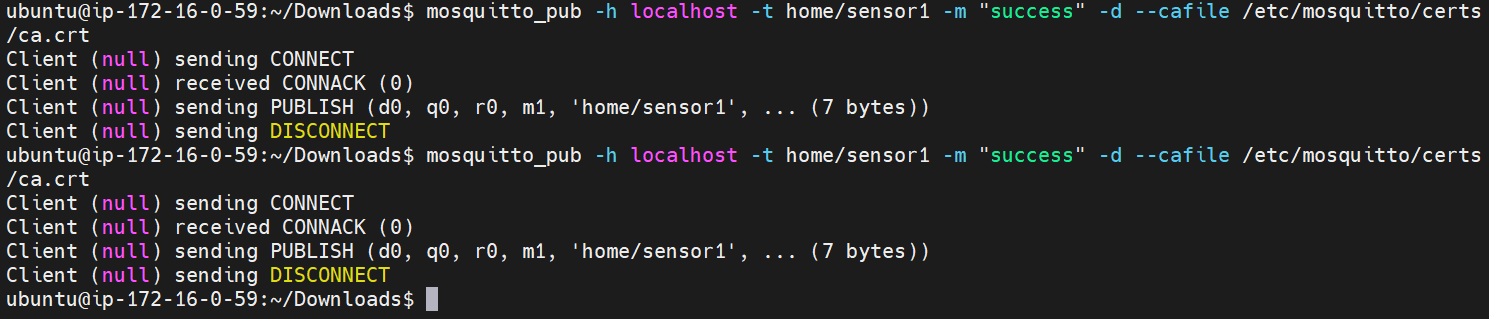
可以使用官方的伺服器來進行 TLS 測試: test.mosquitto.org
MQTT 其他常用工具
- MQTTlens:
它是 chrome 瀏覽器的附加組件,對於除錯和快速測試非常好用,我們可以使用 Web 界面發布和訂閱主題,且比 cmd 更易於使用
Reference
- MQTT--Getting started
- Mosquitto MQTT Broker
- How to Install The Mosquitto MQTT Broker on Linux
- MQTT教學
- mosquitto.conf man page
To know that we know what we know, and to know that we do not know what we do not know, that is true knowledge.
Author: Andy Chung
Article link: https://chiachin2686.github.io/2021/07/lightweight-mqtt-broker-mosquitto/
License: CC BY-NC 4.0